
How to Install Admiral SpaceMaker Composite Decking: A Step-by-Step DIY Guide
What you’ll walk away with
Admiral SpaceMaker is a solid-core, tongue-and-groove decking system built to give you a finished deck surface and a dry space underneath it, using cellular PVC boards capped in ASA and joined with a compressed silicone gasket that channels water to the deck edge instead of letting it drip through. Installing it correctly means paying attention to a few details that don’t come up with standard board-and-gap decking.
This guide walks through four phases: gathering the right materials and tools, pitching the deck so water actually drains, choosing a railing approach that fits your design and local code, and fastening the boards so the hidden-fastener finish looks clean and stays watertight. Each section is built around the manufacturer’s own reference diagrams, so you can see exactly what the process looks like before you pick up a drill.
By the end, you should have a clear plan for your specific project and enough confidence to start cutting boards. If you want moving footage alongside the diagrams here, Admiral also publishes installation videos covering the same steps, which we’ll point back to later in this guide.
What to buy before you start cutting
The core SpaceMaker checklist covers the deck boards themselves, a square-edge or perimeter board for finishing edges, an edge strip, ledger flashing, and a perimeter gutter or flashing where water needs to be collected, plus concealed fasteners to hold everything down. Admiral’s own reference sheet lays these out alongside the recommended tools, so it’s worth printing before your first trip to the lumberyard.
A few items on that list do specific jobs. At the ledger, Admiral specifies Everflashing Deck Ledger Flashing, an aluminum piece shaped like an upside-down capital F that keeps water from working its way behind the house wall. At the perimeter, you can let runoff drop straight to the ground or capture it with a gutter routed to a downspout; Admiral also sells an optional concealed gutter system called the Waterbox if you want a cleaner look underneath.
For cutting, a 7-1/4 inch, 44-tooth carbide blade is the standard choice for composite and cellular PVC boards. It’s the same tooth count Diablo and Crescent build into their dedicated composite blades, and it leaves a cleaner edge than a general-purpose wood blade.
Fasteners matter more than they seem to. Stainless steel screws are the recommended option across composite decking brands generally, since other metals corrode and leave rust streaks over time. If you’re near the coast, 316 stainless is worth the upcharge over 305, since it holds up notably better against salt spray.
Setting your slope before you set a single board
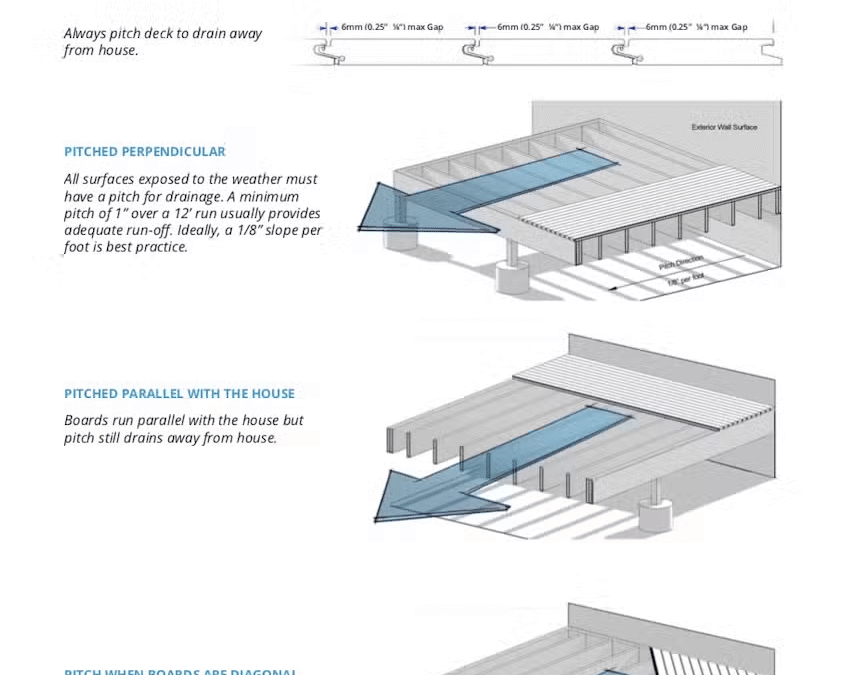
A deck built dead level against the house will pool water at the threshold every time it rains. The fix is a slight tilt away from the structure, and Admiral’s installation diagram lays out three ways to get there depending on which direction your boards run.

The baseline number to remember is 1/8 inch of drop for every foot of run, away from the house. That’s the minimum pitch cited across composite decking guidance, and some manufacturers push it to 1/4 inch per foot for extra margin. You build this into the frame by setting joist heights, not by relying on the boards themselves to shed water.
Board orientation changes how water travels across the surface, but not whether you need the pitch in the first place. Run boards perpendicular to the house and water moves straight along their length toward the yard, the simplest path. Run them parallel to the house and water has to cross gaps and edges to get away, which still works as long as the frame underneath is sloped correctly. Diagonal layouts look sharp but typically need tighter joist spacing since the boards span a greater effective distance between supports.
Whichever layout you pick, the pitch comes first. Orientation is a design choice you make after the frame already slopes correctly, not a substitute for it.
Four ways to finish the edge
Admiral’s railing overview lays out four approaches, and which one fits depends on how your deck is framed and how you want the edge to look.
Surface mount with edge strip sets posts on top of a narrow strip of structure at the deck’s edge, using a base plate rather than notching into the rim joist. Surface mount with post mount works the same way but pairs the base plate with a dedicated structural post kit, often metal, that carries the load while composite sleeves and cladding cover it. Both skip the older method of building the frame around inset 4×4 posts and bolting through the rim joist.

A picture frame border runs perimeter boards around the field boards, with posts set just inside that border, sometimes requiring the border boards to be notched around them. This approach needs perimeter blocking underneath to support the border, and a small gap, roughly 1/8 to 1/4 inch, between the composite boards and the posts to allow for movement.
Outboard railing ties posts to the fascia line or added blocking beyond the main deck field, keeping the rail structurally separate from the boards you walk on.
Guard height and opening limits vary by location. The IRC baseline is 36 inches, but places like California and New York City require 42 inches. Check your local building department or a licensed architect’s plans before finalizing any railing design.
Getting a tight, consistent fastener line
Start each row the same way: snap a chalk line for your starter board instead of trusting the house wall or deck edge to be straight, since neither usually is. Every board after that should be pressed firmly against a spacer at each joist before you drive a screw, not just eyeballed into place. A scrap gap block or a string line stretched across the joists gives you a physical reference so the gap stays the same width from one end of the deck to the other, rather than drifting wider or narrower as you go.

Admiral’s fastening diagram shows this pressing step directly: hold the board against the spacer, apply steady pressure, then fasten while the gap is set. If your system’s clips fix the gap for you, the pressing step is still what keeps the board seated tight against the clip before the screw goes in. If you’re using an edge-screw approach instead of clips, check your specific fastener’s instructions for the correct driving angle, since edge screws and clip systems aren’t interchangeable in how they’re installed.
For cutting boards to length, a 7 1/4 inch, 44-tooth composite-specific blade gives a cleaner edge than a standard wood blade and reduces chipping on the capped surface. Use stainless steel fasteners throughout, since they hold up against moisture better than coated steel over the life of the deck.
For trim work around posts, flashing, or transitions where caulk is called for, OSI Quad Max, NP-1, or Titebond WeatherMaster are the sealants referenced in Admiral’s materials, each rated for exterior use and flexible enough to move with the decking without cracking.
Work one row at a time, check your gap at every joist, and resist the urge to skip ahead and true things up later. A deck that’s pressed and spaced consistently row by row is what gives hidden-fastener decking its clean, uninterrupted look once the last board goes down.
Watch the process in action
If you’d rather see the pitching, fastening, and railing steps in motion, Admiral SpaceMaker’s outdoor deck installation page hosts a set of installation videos covering the system start to finish. They’re a good complement to this guide, not a substitute for it: the written steps here cover the reasoning behind each rule, while the videos show the hand movements and pacing that are hard to fully capture in photos, like exactly how much pressure to apply when seating a board against a spacer, or what a properly pitched run looks like from ground level.
Watch them side by side with your materials list before you start cutting boards. Ten minutes of video can save you from misreading a diagram and having to redo a row.
See and feel the board before you buy
Reading about board texture and color is no substitute for holding a piece in your hands. Before you order materials, request a free sample through Admiral SpaceMaker’s free sample page, where a short form asks for your name, address, and a few project details, then sends a physical sample your way.
It’s a low-pressure way to check color, texture, and board profile against your railing choice and house trim before committing to a full order. No obligation, no upsell, just a chance to see the material in daylight on your own porch or kitchen table.
Once the sample confirms your color and finish, you’ll have everything from this guide, the checklist, pitch rules, railing options, and fastening technique, ready to put to use.
Request your free SpaceMaker deck sample and start planning your project.
Sources
- Outdoor Deck Installation — Admiral SpaceMaker
- How Much Slope Does A Deck Need For Water Runoff? — CalcFormula
- Free Deck Sample Request — Admiral SpaceMaker